Manic's Gaming Boards build - A long log of events

Fimm McCool

Member
Given that you've painted the bottom of the river leaving it clear won't be too much of an issue. Are you pouring deeper than 25mm anyway? That's pretty deep for a tabletop river.
 

ManicMan

Member
well, the Foam slabs I used are 30x10x4cm blocks, and for the Lake, it goes all the way to the base, so.. I guess the MAXIMUM depth is at that point is probably.. mm.. yeah, well whatever ^_^; just says maximum is 25mm, so should be fine. ^_^ I'm a bit rubbish at eying up sizes at times.. Remember years ago I tried to have a unit charge forward, undershot it so they didn't get into attack, but was in perfect range for the rival unit which pretty much wiped them out..

River isn't as deep as the lake.
 

ManicMan

Member
ugh.. did a test pour on a small frame I made up, a 30x30x10 box, did that pour on Sunday I believe. maybe Saturday.. minor leak issue which I thought dealt with making sure it was sealed but oh well, thats minor.. not alot leak and I was able to sort it out.

problem is.. it's now Thursday and the top is still a bit tacky.. I only poured about.. maybe 6mm depth, mixed up the correct 2:1 ratio. The only issue I can think is while I thought I mixed it pretty well, maybe I didn't quite mix it up completely.. The frame was a 2mm plywood one and as for Room temp.. mm.. maybe a bit on the cooler side but not too bad I don't think.. checking with something in my room with a temp gauge.. about 18c right now and it's a cool-ish day (mostly rain). For an ambient Temp of 15c (minimum) it claims 96 hrs for the initial cure.. with 20c being 72 hrs.. it's pretty much at the 96 hours if I did the pour on Sunday, and past that if I did it Saturday. I was going to do a small pour on top to try some water effect on it but with it still being slightly tacky to the touch, I'm not sure.. I'll have to do a better check on it on Saturday (bit busy tomorrow).
 

ManicMan

Member
glassCast 10/50 clear epoxy casting resin.
still slightly tacky on the surface but I've just done something earlier which is looking really nice and waiting till tomorrow for that to dry
 

Fimm McCool

Member
Usually find if there's any stickiness with that it's due to a bit of moisture getting into the resin or the temperature being too low. Giving it a GENTLE burst with a hairdryer or putting it in a warm spot for a couple of hours should help.
 

ManicMan

Member
fair enough ^_^ I do prefer cooler temps to hotter ones so it might have been a little bit too cold though didn't think so.

like I said earlier, I did a bit something to it today and that's turned out pretty damn well.. I took some epoxy resin I was using to glue some things (often i use cheap stuff from pound land but got some Gorilla 2 part epoxy which is pretty nice and clear) and used a old paint brush to brush it over the surface and it's made a very nice ripple like effect.. reminds me of a swimming pool or other such things.. gentle but active enough to look like water. very nice. My test wasn't painted so I think looks a tiny bit bland (so I was debating a slight watered down colour wash) but I think when on the painted parts for the river, it'll look good. Also these ripples don't look too much like they are going in any real direction, so with separate tiles, putting them together in different ways shouldn't look bad (I was a bit worried that if I had too much, then if I have one board with the water going in one direction, and another board with it going in another direction, the clash would look bad..

cause it's only a very thin layer, this is pretty much cured now but I'll leave it till tomorrow then take a picture.. see if I can get a good shot at them shadows and reflections..
 

ManicMan

Member
thought it was something like that but also thought it was something like 12 hours for full cure.. seamed cured though ^_^
 

ManicMan

Member
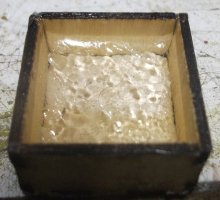
Water.JPG
Small 30x30 box. due to a slight mistake, it wasn't resting as flat as it should have so the water is at an angle but that doesn't matter.. also.. little bit of hair got in on the top coat.. bane of long hair ^_^;


anyway, surface is all dry, gentle like ripples which give a nice water like reflection. I'm pretty happy with how it turned out.
 

ManicMan

Member
sigh... just poured the first board. About 1cm depth to the river.. I put a couple of parcel tape coated pieces of plywood as dams, clamped them tightly in place, I then went around the edges with hot glue gun. Looked pretty damn good.. roughtly worked out how much resin I needed, (working out the cubic volume and converting that to ml to measure out and pour (also working out the 2:1 ratio).. might have got it slightly off but.. seams good enough..

anyway.. got the board pretty flat, poured.. checked it on a bit later and slight but noticeable leaking at small bits both sides.. needed to glue a bit better next time (I used hot glue cause it would come off pretty well when needed and it should help seal when wanted to seal).. oh well.. good thing it 's a good day so I did this out side. Hopefully not too hot
 

ManicMan

Member
bugger.. Gonna leave this image at full size cause my close ups didn't go great but..
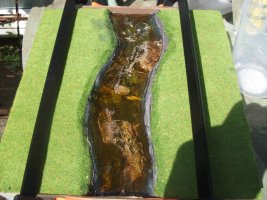
DSCF2593.JPG
I think maybe it was a bit TOO hot today.. Lets see:
1) Some cracking on the paint/plaster on the sides of the River. this isn't a huge thing.. touch most of that up with some paint and some flora
2) it's a bit... yellow tinted.. Not sure why on that bit.. but fair enough for a river I guess
3) alot of air bubbles formed.. at first, this seam to start to form as it was pushing air out and the bubbles started to pop but then... yeah... not fantastic.. but.. guess I can get away with river life and maybe the odd bits of weed and stuff can hide some of it.
4) it's got cracks in it.. There are visible and clear cracks in the rivers. when putting your finger over, you can feel they are cracks..

Do I think this board is completely toasted? no.. Just not fantastic even after I put a top layer to texture it.. I'm thinking maybe putting some flora and stuff before I texture the surface so that it can be seen going a little under..

What do I personally think went wrong? It's already feeling solid to the surface.. after about 2 hours..
i) Maybe when I mixed out the amounts I screwed up. My notes and what I remember say I had 150ml Resin to 75ml hardner.. though as the jug I used doesn't (or atleast where I was looking) measure halfs, I could be slightly off but that it was about right, putting a total of 225ml of resin, no more then 250ml.. that 25ml possible extra of hardner might have created a slight problem with too much hardner.. I don't think it was as much as 25ml more but it might have been up to that..
ii) whatever Temp it is... might be just too damn hot. It says the maximum ambient temp should be 25c.. we are late spring.. I didn't quite expect it to be quite as hot as it is, but maybe its been more 30c or more.. Having got my temp meter to check right now.


Anyone else got ideas what else might have screwed it, or any ideas for.... 'improving' the look of this one?

Minor update: according to the temp meter on the window which is.. some old thing now.. it's about 40c outside.. yikes..
 
Last edited:

Fimm McCool

Member
Looks like it has gone off too fast. The bubbles haven't had a chance to burst and it's exothermed so much when curing that it has cracked and burnt slightly (the yellowish colour). Mix ratio of Glasscast is 45/50:100 hardener:resin, so if using 225ml of resin you want 112.5ml (112-113 fine) of hardener. I'd always measure using weight on a pair of scales, much easier to be accurate by weight than volume. Put the scales in a plastic bag so you don't get them messy and measure out the two parts separately then combine them. Also make sure you shake both resin and hardener before measuring them out as they can separate out leading to a very slow or very fast cure depending what's left in the pot. Be careful with epoxy going off too fast as it can catch fire (in extreme cases) and even slightly overcooking it can lead to a nasty, smelly smoke.

If the big bubbles bother you then you can sand them down once fully cured (wear a mask, do it outside etc.) using progressively fine grit and polish until you get a clear surface again and either pour a thin layer over the top or use mod podge to disguise it. That will also hide the cracks. Nothing you can do about the colouration I'm afraid.
 

ManicMan

Member
I used 150ml of resin to 75ml of hardner making 225ml as it says 2:1 by volume ^_^ which is a bit easier to measure out for me (I did have some cheap digital scales but.. bits of resin and silcone on them and the battery cover kinda went missing.. could patch it up but oh well. didn't think of putting them in a bag in the past ^_^ it was years ago when I was more first screwing around with resin pouring and stuff.

I do have a bridge I've been working on but it was going to be moveable, so I could choose which board to put it on based on what is required, but I could easy make one or something for this board. Might do the logs and stuff more.. and river plants and stuff.. bit of algae or the like.

The only real problem with the colour is matching it with the other boards when they are done.. but that's fair enough, never gonna be a 100% match anyway ^_^;

I think maybe sanding will take down some of the bubbles but I think some of them are a bit too deep to really get much.. also the cracks are a bit deep.. didn't really think filling the gaps in the cracks would smooth it out much (little bit of resin which hasn't cured yet in the mixing jug (plastic) but I didn't think putting that to fill the gaps would help.. Doesn't seam to smell or anything but. yeah.. so mostly been too hot outside so it's over baked it.. annoying.. I wanted to do it outside so 1) I had the spare, 2) if it leaked, it wasn't as big a deal, 3) any smell wasn't a problem.. oh well.. Live and learn ^_^ thanks
 

ManicMan

Member
trying to figure out a few things.. I'm not fantastic at using sandpaper to make things smooth as new so debating if it's worth trying to sand out some of the surface bubbles... also not quite sure what filling the cracks will do but can't make it any worse really ^_^ When I do some surfacing next, I'll probably be filling them anyway..

trying to look around locally for any twigs or bits which would work well as logs but might need to do more an man-made way.. my PLA printer is good enough for printing some logs I might need. then there is a case of the flora.. trying to think what plants/weeds would work.. I'm wondering about some water lilies. Anyone know any good way to make some pads and the like? I got some bits but not a huge lot of decent river planets.. Hopefully, I'm gonna try to do another board resin today, or tomorrow.. doing it inside this time (which is annoying.. today seams to have been a MUCH better day.. if only I knew it was gonna be SOOO hot out). Also have a bit of idea how to get a better seal ^_^
 

ManicMan

Member
yay.. poured the next board this morning. It's in doors.
1) It's not leaked.. I know what I did wrong last time. Last time I put a tiny bit of hot glue to hold the plywood dams and then glued around the edge and clamped them.. having that bit of glue in the first place, of course, created a small gap.. this time, I just clamped the wood and then hot glued the edges and that is looking perfect as there has been no leaking.
2) while there are two patches (one with a couple of bubbles on the surface and one with a few more) of bubbles they are only on the surface and not a real issue... I did try to pop them a bit and the resin was starting to get hard but still pretty soft so I was able (not sure what to compare it to).

So that board is going really well.. Kinda ran out of resin so while I tried to work out the mixture right, it's... kinda right ^_^ cause I thought I had a bit more left in the bottles then I did.. got some more on order. So this will probebly take.... a few days to fully cure.
 

ManicMan

Member
some bubbles died down but still the odd one on the surface, bit busy today so I'll see about the weekend for photos (and should be solid enough to remove the clamps). new lot of Resin turned up today, and you could see through the cardboard, it was a bit leaky.. looks like I've lost about half of the Resin leaked somehow (looks like a bad seal on the lid) and with the full wrap label, had to tell how much of the hardener but looks like some of that has leaked.. Annoying,.. but these things happened. I've contacted the company so hopefully something will be sorted out.
 
Back
Top