The Age of Strife

Just a can of Hycote Matt Lacquer I had hanging around that we'd use for sealing (somewhat) some of the Halloween props last October. Nothing special, but seemed to help stick down some of the loose rocks, seems matte enough for this purpose - generally I quite like Hycote, I use their grey etch primer on stubborn resins sometimes.

For my minis I airbrush them all with Vallejo Polyurethane varnish or brush it on sometimes when I want a thicker coat. I've never really quite trusted spray can varnishes for that job.
 
Last edited:
Just a can of Hycote Matt Lacquer I had hanging around that we'd use for sealing (somewhat) some of the Halloween props last October. Nothing special, but seemed to help stick down some of the loose rocks, seems matte enough for this purpose - generally I quite like Hycote, I use their grey etch primer on stubborn resins sometimes.

For my minis I airbrush them all with Vallejo PU varnish or brush it on sometimes when I want a thicker coat. I've never really quite trusted spray can varnishes for that job.
Ta
 
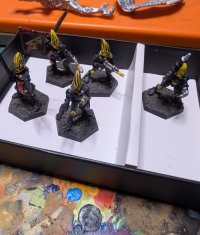
Just finished putting some replacement arms and weapons on the few of Robin Ewbank's Eldar that had lost them - Robin did mention the Guardians in particular had seen a lot of tabletop action and many might need a little dab of paint here and there. So I'll tidy up the re-prime on the arms and see if I can quickly get these lads and lasses back in the cabinet with their colleagues with a simple paint job on the arms. One fella still needs something popping on the end of that shortened lasgun, but I'll find an off-cut of something to use. Anyhow nice to feel like I've made a start on these at long last.

eldar-arms-repaired.jpg

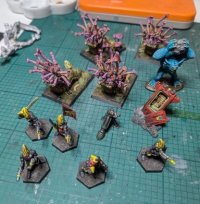
Think I will probably try to get back to finishing up the Night Haunts next to get them out of the way. I'm also slowly getting back onto the Beasts of Nurgle. They have not worked as well as I hoped, but I think I'll just push on and get them okay-ish and accept that is what they are.
 
Haha! You’re quite right @Eric! Wonder why they settled on round bases?

In my mind I associate hex bases with D&D; my formative first minis was the Dungeon Monsters Set and all the hex maps prevalent in the games.
 
Hexes are sci-fi? the only ones I used or saw in person in the day were on Fantasy figures...

It was a pretty small minority, but some of my Rogue Trader adventurers had hex bases out of the blister. The first scout, I believe. (The one who looks like Lawrence of Arabia with a shuriken catapult.) Maybe the sensei. I've always had a few.
 
huh... alot of the old citadel box sets (mostly the BC range) I've seen in person had Hex bases... wonder if they just randomly picked a bunch for them. And they were fantasy... learn something new all the time.
 
Actually managed to do some painting today after what seems like ages. Granted I should probably have been thinking and preparing a WFRP adventure, but afraid I decided to relax with some painting instead, sorry. Managed to finish up a small pile:

progress.jpg

Small photo, since I'll do some proper photos and didn't want to spoil the proper photos! :)

Repaired the Eldar, roughly matching the painting style. Luckily the Guardians only have a basic paint job (good for the age Robin was when he painted them) so no real shading. The black armour looks like it might have had some silver maybe dry brushed on or something, so I've tried to get something close to that. Hopefully the varnish will help unify my efforts. Anyhow they are perfectly good to sit alongside the others now so happy to have them back to fighting fitness.

Finished up the beasts at long last, along with a Mole Mortar, escape pod and Aquaclops (Retro Raygun).

If I can finish up the NightHaunts soon then I think I might just have mostly cleared my backlog of semi-painted minis - which would be nice.
 
So some WIP rough photos of some more pieces of woodland. I'm starting out with 5mm foamed PVC as the base, that gets an outline scribbled on it which is cut roughly using a knife. I then carve a bevel on the edge of the PVC which can be fairly rough. Then out with the sandpaper to smooth that angular bevel into something that will blend nicely. After that it's time for the tree bases - I've been using a mix of K&M bases and since for some reason I don't have enough of those also some polystyrene tube. I cut off short ¼" pieces and superglue them to the board, re-enforcing the edges with some baking powder and then building up a stump from some Apoxie Sculpt. I then use a light weight filler to blend in the tree bases and anything else I've thrown on the board - I've done a few raised areas and so forth just with scrap XPS or PVC.
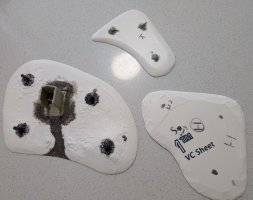
woods-step-01.jpg

Then comes a good spray of primer. Bases are sprayed black on the back (gotta look neat and tidy!) and then the tops are sprayed with a brown and a pistachio to get a green/brown base. Foamed PVC takes the paint really nicely and the warm weather has ensured everything dries nice and quick! Any details get a quick "proper" paint now, but nothing special as they are lost in the undergrowth a bit! We're then onto the first layer of flocks. For the most part sponge/foam rather than sawdust. That builds up a reasonable mess to represent the ground under the trees
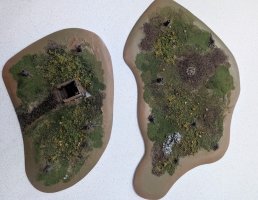
woods-step-02.jpg

Once that is properly dry I do a "summer" static grass (2mm) around the outside, blending it into the inner flock a bit so hopefully it looks okay. After that I tend to do another pass of static grass in a different colour to give a bit of interest away from the edge and then finally more static grass (6mm) to blend the border between the flocks and static grass more. I tend to use autumn colours for the longer grass.
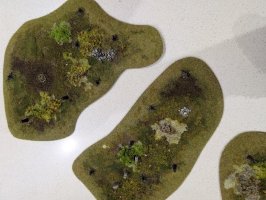
woods-step-03.jpg

After that we're onto some more clump foliage to build up the underbrush, that's all soaked with PVA (hence the white splurges above). Then in go the trees (superglued) and some Apoxie sculpt is used to blend the stump into the tree trunk. A few tufts to add some flowers and help hide any bad "joins" between flock and we're done building. A coat of varnish to just help seal the flock onto the trees (otherwise they do shed quite badly) and we can go down to the woods today! :)

So that'll be eight patches in total for now. I'm planning to do a couple of stand-alone trees and I do have some others, but I think I might leave those for other projects for now at least and I've enough woodland to happily cover 2' x 4' if needed.
 
Back
Top