ManicMan
Lord
well.. I have even commented about wanting to get my boards done for a while and Quidamcorvus shows his fantastic work for his Mordheim boards and others have too of course.. So I have started some in the past but never got far.. lets more try another attempt.
I ordered some stuff to start working on them, and while I was waiting for it, Fimm started to show his work on some new boards so.. I kinda got some big shoes to match up to eh? (which is funny as.. I wear UK size 13 boots myself which is.. erm.. EU size 47, and US size 14 or thereabouts).
So.. well.. While I'm still doing.. way too many things, I do have some time if I can get the energy and hopefully going 'public' like this also helps give me a push ^_^ so lets start with Part 1
I have 9 1foot by 1foot MDF boards to make up a 3 x 3 gaming board. I had tried to do something with them a while back but wasn't happy with it at all. I even made up a couple of River sections which you lay on top of the boards and really not impressed.. So.. got some foam slabs (call themselves diorama foam but oh well, good enough. The boards aren't quite one foot I think, they are more 300mm which is just a shy under1 foot (304.8mm).
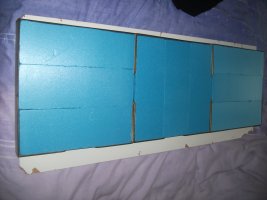
By getting some foam, I could put that on top of the boards as a base to allow easy dips and stuff in the landscape. Fine.. 2 problems.. the only cutter I got for cutting such stuff isn't that great and for me to cut a straight line300mm long? Forget that.. so had to get some foam the right size.. the one I ended up getting were in fact, 300mm x 100mm x 40mm.. well, no problem cause 100x3 is 300, so I just need to put three slabs together for each board.. so that's 3x9, 27 slabs.. they were sold in packs of 5s so got 30.. fair enough. Useful stuff. Price wasn't too bad either.. not fantastic but not too bad. The second of the problems was the height.. 40mm.. that's 4cm tall.. its.. a bit big but.. oh well.. it'll have to do.
So.. first thing first, well.. a mixture of planning out the boards and foaming up some boards. sadly as things are never 100 exact, the first board I foamed, the foam very slightly overhangs on end, and slightly ends a bit early another end (but not opposite ends so it's not just me not lining them up right. Oh well, that can be dealt with.
So, going onto the first thing which requires any real work, Planning the boards!
I had already some idea when I tried this before so I knew what SOME of the features I wanted were. The Boards kinda need to be able to be re-arranged to a degree so that gives some limits.
First, I wanted 3 of them to be a Cliff. I had tried to do that one before but was really not impressed with how it was turning out after 2 boards were started. Of them three, the idea was kinda half-half with the cliff. It would be some height and give two levels, as in you could play on the ground level, or have some area of the top of the cliff which could be moved on. I had planned one to have a kinda step way to getup. I think ideally, I would need to have two forms of steps cause only having one way up a cliff? That's pretty good for defence, hard for anything else. Was thinking one to be kinda natural and the other probably man (or other creature) made, so some wood steps for figures to climb up and move on. Also gives some nice creation options there.. Also, also, Possible the wood steps aren't build into the board so could be placed depending on the map.. fair enough.
Next, I want some river. So 3 boards are going to be river sections. Want to work out abit more but it'll probebly be fairly grid like since the three boards need to have the river ends matching up. No problem though. I'm not as against 'grid river' as some people are.. you would be surprise how much river way of England alone is not totally natural. You had some farm land or settlement, you would build near a river, or divert the course of the river to get it where you wanted it.
For the final three, One is gonna be part of the River going as a feeder into a small lake, which has an island in the middle. I say small lake but. Taking up most of the 1 foot tile so, work out that scale.. oh.. there is a calculator for that.. it's about 60 foot.. so.. between 40-50 foot of that is lake. Is that a small lake? Not sure ^_^; the other two are as well probebly be grassy plains. Not completely flat. Maybe one will have a bit of a bare patch for a bit of a small settlement.
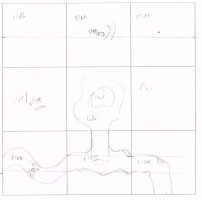
Right.. made up a little grid of 3x3 so I can sketch it out and did that as a first draft, the river section will be one kinda straight (in that it enters the left side, exits the right, but there is some movement and shaping to the course), the middle one is a T shape which for this set up, runs to the lake in the middle of the grid. The third part is a L shape. This gives three different river sections which can be re-arranged in a number of different ways. Adding a bit more detail to the sketch, I think one of the river sections will have some stepping stones, allowing easy access across and I might make are moveable wood bridge which can be placed when required more the none set into the board, like with the cliff.

Very rough sketch as you can see but that's fine. Alot of detailing will come out when making it or just added a bit later as I fill in details more.
Now, one thing I wanted to think about was Edging. Do I leave the boards with the foam edges or add some more solid edging? Well.. first problem.. in 2023, I got a small 'portable' laser cutter. A low-ish power home deal which has been fun and useful to me making card trays, figure boxes, movement trays etc, as well as some stuff for others like little wood statues and bits. But it's a Diode laser which is limited in cutting power(it seams to strain on 2mm thick MDF, but plywood is fine and that's okay with me, though I can just about cut 2MM MDF.. but personally, plywood is more then good enough for me.) but it's cutting size is I think 220x250.. these boards are 300x300.. that makes a problem. And cause it's a portable model, it's pretty tricky for me to line up something so I could cut the wood, 250mm long, move it along a bit and tell it to cut the other 50mm to get a straight line. So laser cut edging is kinda out. Even with a jigsaw, cutting straight lines is not a real skill I have so that's out too. Basically, don't bother with thick material like most woods. I do have a digital die cutter so it's possible I can cut some card and that cutter does do 300mm so that's possible.. but it's just as easy to use scissors for some cut as I can get that cut straight enough.. problem is, If I'm gonna use thin card like that, it's a bit pointless I think.. Cereal box card is a maybe as that is a bit stronger and can be cut easily but... not sure.. I do have some foam board which is.. about 5mm thickness so that's even more a possible too.. in fact, my die cutter might be able to cut that but.. not worth setting it up for that, but not amazingly hard to cut.
I don't really have the space to have much of a 'work bench' so for now, I'll only do one board at a time for the basics anyway. This means I've glued 3 pieces of foam to the first board and probebly won't get the next one ready just yet. I can probably have a couple on the go at a time but.. soo much stuff, soo much to tidy up..
I ordered some stuff to start working on them, and while I was waiting for it, Fimm started to show his work on some new boards so.. I kinda got some big shoes to match up to eh? (which is funny as.. I wear UK size 13 boots myself which is.. erm.. EU size 47, and US size 14 or thereabouts).
So.. well.. While I'm still doing.. way too many things, I do have some time if I can get the energy and hopefully going 'public' like this also helps give me a push ^_^ so lets start with Part 1
I have 9 1foot by 1foot MDF boards to make up a 3 x 3 gaming board. I had tried to do something with them a while back but wasn't happy with it at all. I even made up a couple of River sections which you lay on top of the boards and really not impressed.. So.. got some foam slabs (call themselves diorama foam but oh well, good enough. The boards aren't quite one foot I think, they are more 300mm which is just a shy under1 foot (304.8mm).
By getting some foam, I could put that on top of the boards as a base to allow easy dips and stuff in the landscape. Fine.. 2 problems.. the only cutter I got for cutting such stuff isn't that great and for me to cut a straight line300mm long? Forget that.. so had to get some foam the right size.. the one I ended up getting were in fact, 300mm x 100mm x 40mm.. well, no problem cause 100x3 is 300, so I just need to put three slabs together for each board.. so that's 3x9, 27 slabs.. they were sold in packs of 5s so got 30.. fair enough. Useful stuff. Price wasn't too bad either.. not fantastic but not too bad. The second of the problems was the height.. 40mm.. that's 4cm tall.. its.. a bit big but.. oh well.. it'll have to do.
So.. first thing first, well.. a mixture of planning out the boards and foaming up some boards. sadly as things are never 100 exact, the first board I foamed, the foam very slightly overhangs on end, and slightly ends a bit early another end (but not opposite ends so it's not just me not lining them up right. Oh well, that can be dealt with.
So, going onto the first thing which requires any real work, Planning the boards!
I had already some idea when I tried this before so I knew what SOME of the features I wanted were. The Boards kinda need to be able to be re-arranged to a degree so that gives some limits.
First, I wanted 3 of them to be a Cliff. I had tried to do that one before but was really not impressed with how it was turning out after 2 boards were started. Of them three, the idea was kinda half-half with the cliff. It would be some height and give two levels, as in you could play on the ground level, or have some area of the top of the cliff which could be moved on. I had planned one to have a kinda step way to getup. I think ideally, I would need to have two forms of steps cause only having one way up a cliff? That's pretty good for defence, hard for anything else. Was thinking one to be kinda natural and the other probably man (or other creature) made, so some wood steps for figures to climb up and move on. Also gives some nice creation options there.. Also, also, Possible the wood steps aren't build into the board so could be placed depending on the map.. fair enough.
Next, I want some river. So 3 boards are going to be river sections. Want to work out abit more but it'll probebly be fairly grid like since the three boards need to have the river ends matching up. No problem though. I'm not as against 'grid river' as some people are.. you would be surprise how much river way of England alone is not totally natural. You had some farm land or settlement, you would build near a river, or divert the course of the river to get it where you wanted it.
For the final three, One is gonna be part of the River going as a feeder into a small lake, which has an island in the middle. I say small lake but. Taking up most of the 1 foot tile so, work out that scale.. oh.. there is a calculator for that.. it's about 60 foot.. so.. between 40-50 foot of that is lake. Is that a small lake? Not sure ^_^; the other two are as well probebly be grassy plains. Not completely flat. Maybe one will have a bit of a bare patch for a bit of a small settlement.
Right.. made up a little grid of 3x3 so I can sketch it out and did that as a first draft, the river section will be one kinda straight (in that it enters the left side, exits the right, but there is some movement and shaping to the course), the middle one is a T shape which for this set up, runs to the lake in the middle of the grid. The third part is a L shape. This gives three different river sections which can be re-arranged in a number of different ways. Adding a bit more detail to the sketch, I think one of the river sections will have some stepping stones, allowing easy access across and I might make are moveable wood bridge which can be placed when required more the none set into the board, like with the cliff.

Very rough sketch as you can see but that's fine. Alot of detailing will come out when making it or just added a bit later as I fill in details more.
Now, one thing I wanted to think about was Edging. Do I leave the boards with the foam edges or add some more solid edging? Well.. first problem.. in 2023, I got a small 'portable' laser cutter. A low-ish power home deal which has been fun and useful to me making card trays, figure boxes, movement trays etc, as well as some stuff for others like little wood statues and bits. But it's a Diode laser which is limited in cutting power(it seams to strain on 2mm thick MDF, but plywood is fine and that's okay with me, though I can just about cut 2MM MDF.. but personally, plywood is more then good enough for me.) but it's cutting size is I think 220x250.. these boards are 300x300.. that makes a problem. And cause it's a portable model, it's pretty tricky for me to line up something so I could cut the wood, 250mm long, move it along a bit and tell it to cut the other 50mm to get a straight line. So laser cut edging is kinda out. Even with a jigsaw, cutting straight lines is not a real skill I have so that's out too. Basically, don't bother with thick material like most woods. I do have a digital die cutter so it's possible I can cut some card and that cutter does do 300mm so that's possible.. but it's just as easy to use scissors for some cut as I can get that cut straight enough.. problem is, If I'm gonna use thin card like that, it's a bit pointless I think.. Cereal box card is a maybe as that is a bit stronger and can be cut easily but... not sure.. I do have some foam board which is.. about 5mm thickness so that's even more a possible too.. in fact, my die cutter might be able to cut that but.. not worth setting it up for that, but not amazingly hard to cut.
I don't really have the space to have much of a 'work bench' so for now, I'll only do one board at a time for the basics anyway. This means I've glued 3 pieces of foam to the first board and probebly won't get the next one ready just yet. I can probably have a couple on the go at a time but.. soo much stuff, soo much to tidy up..


