Thanks Warduke and Tex,
Yes great reference or what! When I saw it I instantly thought yup, that's it
")
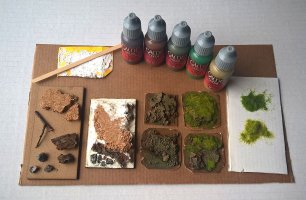
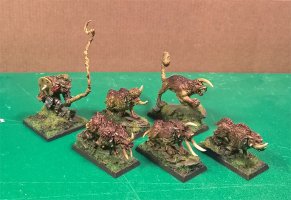
Creation how-to, simple version: Cork, plaster, pebbles, sticks, textured gel, paint and grass flock, pva glue and super glue.
Paint colours I used are dark brown, mid brown, yellowy green, bluey green, sand. Two flock colours; a darker forest green and a brighter yellow green.
Detailed step-by-step version for those who want to get more insight into the process. Do not venture further unless you have a cuppa and a comfortable seat. Skip for pic!
---------------------------------------
BUILDING.
I built the bases using cork and plaster. Crucially, I work each base over until it no longer looks like pieces of cork stacked horizontally on top of the base. This involves:
- Chipping away the edges into more natural looking earth mounds, cracks and slopes. Convex gradations, concave, furrows, steep slopes, shallow slopes. Variation, basically.
- Filling in select bits between the cork and base with plaster. It's working with slopes and transitions like the step above, but filling in positive space instead of hacking out negative space. Having a way to both add and remove shapes just makes for more flexibility as you go. Pockets of plaster are also handy for embedding some pebbles in, to look like boulders embedded in the ground. Push them down and smooth the plaster around the edges, looks like the sediment is encroaching on the stone. Another thing I get from cork and plaster is more of a fragmented clumpy earth look in some places and a smoother silt buildup in others.
- One thing I do for some bases is to slice a cork bit horizontally into two planes, deliberately at a slight bit of an angle. This makes the bases less artificial in two ways; I get both a bit of height variation and a bit of deviation from the perfect horizontal plane. Also, these flat slopes are sometimes exactly what a model needs if it's designed a bit off-kilter. The model now looks better balanced AND more in harmony with its base. Two birds with one stone.
- A note on glue: having both pva glue and superglue is handy because one dries fast and one dries slowly. Sometimes I want to fix a part RIGHT NOW, for example if I want to align the model to the cork piece in a particular way I've just mocked up and don't want to struggle to find that attractive composition if I lose it. Or if I just want a quick bond in a sub-assembly and then immediately after a slow bond to work out the rest trial-and-error. At other times I want multiple parts to be flexible for some time, for example if I have a Base-cork-cork-model stack and I want to rotationally align them all attractively. With superglue I get one shot for each bond and if I fudge a single one I fudge the whole composition. Pva glue lets me rotate and counter-rotate bits in place and avoid having parts come together in a wonky way. To some I am sure this may sound as overkill but I find it invaluable to avoid things like models awkwardly positioned, rotated or balanced.
PAINTING
- The first layer is a basecoat of a dark brown. I use craft paint for this which gives me much more mileage, i e doesn't ruin me financially as a textured base can easily suck up a lot of paint. Winsor & Newton Raw Umber, a 500 ml pot for around £10 that is going to last a long time used in this way.
- Into this I also mix a bit of pva glue to seal the cork/plaster build in a bit. Also some Winsor & Newton acrylic based Medium Grain Gel. As far as I gather you could substitute the gel for more glue and common sand/grit of your own choice. But I had some gel around and chucked it in for good measure. Besides adding a bit of texture to the remaining flat cork areas it should act as a bit of a crack filler for any seams left in the cork/plaster. The gel was more of an experiment than a must and it didn't ruin anything
- Liberal drybrush or overbrush if you will using Vallejo Beasty Brown.
- Some drybrushing and stippling using a mix of Beasty Brown with Cayman green and Sick green. Applied in select areas the base now has a bit of brown variation, mottled in varying shades of green. This makes the brown muddy ground come alive with some sense of fine scale moss, lichen and algae kind of discoloration.
- A final drybrush, with a bit of desert yellow mixed into the previous colours, applied sparingly to edges and raised areas to denote a drier state away from the wetter lower layers of the silt.
FLOCKING
- First layer is the dark forest green kind of flock. I applied this more randomly than with a set methodology and it worked out fine. If you put it on a flat surface and leave the cracks earthy it will look like a fresher fissure, perhaps some earth clumps dislodged by a bit of flooding or ground that is so damp that grass prefers to grow on top of the dirt lumps than in the soggy furrows. If you do the inverse and put grass in the cracks and leave the earth tones on the raised slabs it looks more like dirty ground that has tufts sprouting from cracks and crevices where it likes to grow. I used both and got nice variations from it.
- I used a 50/50 water/pva mix, and quite sparingly applied, in the areas I flocked. More of a small dot followed by stippling of even smaller dots than large solid clumps of glue. If you go for heavy solid pva glue blobs you get quite a heavy coverage of clearly delineated grass bits which feels more artificial and covers up most of the ground paint. By being frugal with the glue I got a nice falloff of grass growth and the paint shades underneath interacting more with the grass.
- The very final step was a light spotting of the brighter yellowy flock. Used very sparingly I put these in two places. First at whatever spots looked highest and driest. Secondly in some places where I had covered the largest areas of dark flock to break up the monotony with a couple of brighter tufts.
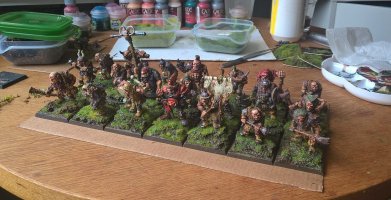
- A final note on flocking was to vary the ratios on each base. This gives you a nice effect when a larger unit is lined up. I find this approach very useful to break monotony and make the basing come alive. Some bases got more grass coverage than others and half don't even have the bright flock applied at all. The underlying paintjob is very forgiving for leaving larger areas unflocked. It's quite hard to resist putting bright flock and a dramatic ground feature on each base when you see how good it did one, but the reward comes when you put the whole unit together. Out of twenty-one bases, only two have a stick log and one has a pebble. In my opinion this looks nicer than if each base had logs and pebbles. If you do want logs and pebbles on all bases, perhaps to emulate a forest floor and not the muddy field I was aiming for I would apply the same principle, but use another feature - a colourful plant perhaps.
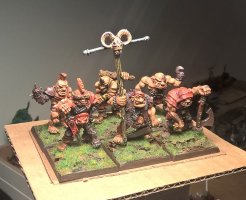
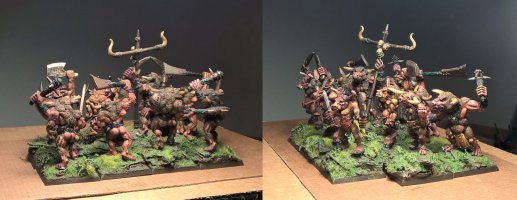
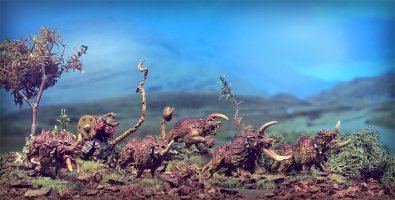
I felt so guilty for this wall of text I amended another shot. This is me being all clever using forward thinking and whatnot. See, some of the guys look a bit larger and meaner and have some red spot colours so they'll look good along my two other long-term army projects: Orcs and Khorne. Here they are.