Spined Dragon /Castle Diorama

Making the Castle Floor
Next was planning the floor. Here I felt that I had 2 options. A plank floor or a stone floor. I thought a stone floor might be a bit less tricky. The first job was to build up the basic height of the floor to match the existing height of the dragon's base. To do this I just cut some thick cardboard out and fashioned it around the dragon's base. *I have no idea what I'm doing here...
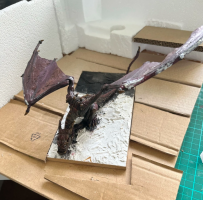
dragon-diorama floor.png

So I'd picked up some thin XPF foam from "The Range" and then downloaded a patio plan from the web. I copied it...drew it on some tracing paper then pricked it out into the foam before using the back of a knife to etch the shapes of the flagstones into the foam.
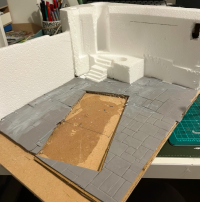
foam-floor-castle-diorama.png

Adding the thin foam with the marked-out flagstones.
 

Golgfag1

Moderator
Sorry to say, but I did'nt see the results of your efforts at BOYL this year, I find the initail push to see the entries too much especially with my then gammy leg (now fixed), by the time I did get there most of the participating entries had been removed, also, too busy with my own thing, but I love your tale of how you got there - stirring stuff and the photos are great. I doubt it'll stir me to paint my own Spinned dragon, which I purchased shortly after the first BOYL (As it appeared to be the stand alone model which determined you as a collector, amongst that initial august company of rogues and reprobates that attend BOYL, some of whom have sadly fallen to the wayside!). My initial enthusiasm in putting mine together wained following the building of the wings and applying the base coats of colour, it now sit above my painting station looking forlorn as I splash paint over other parts of my collection - maybe next year.
 
Sorry, I've been neglecting this post to the point where you will have all forgotten ...or no longer care if you did in the first place, which is an assumption I'm making regardless to spam you with castle pics.

Anyhoo..as I emerge again from under my rock I thought I'd try to geet caught up and share a few more pics of the build.


how to make a model castle garderobe

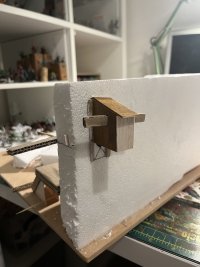
Next, I had some daft ideas to build a garderobe. That's a toilet to the uninitiated. Anyhow, as I keep saying and will doubtless, keep repeating...I had no bloody idea what the hell I was doing or how to do it...So here's how I tried to make it.

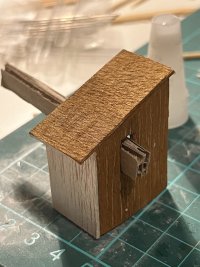
Get some balsa, cut out 2 sides and roof. If it had more time I might have even added roof tiles to it. but for the time being, I thought a wooden roof was fine.

Then, I glued the bits together using superglue...because I'm impatient and can't be bothered waiting for PVA to dry.

Old man paints makes a model castle garderobe

The cardboard rod between the windows was just to make it hold its shape whilst the glue set.

IMG_7953.jpeg

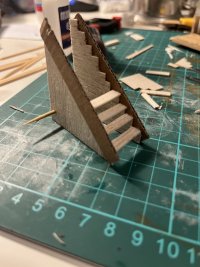
Next to add the wooden staircase up to said Garderobe.

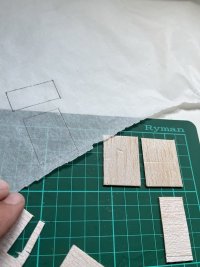
I made the staircase in much the same way, after measuring the height of the staircase, I drew out the design for the steps on baking paper.
Using a pencil, I pricked out the design..and then carefully cut out the template... The actual star footboards were a bit of a nightmare. I wanted them to be functional if needed, so that they could accommodate a simple miniature base. Getting the Devils to stick was tricky though.
IMG_7949.jpeg


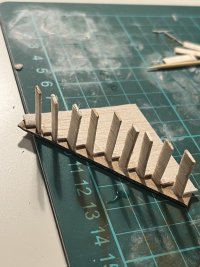
Heere you can see the stairs taking shape....again i held the two sides in position with a cocktail stick, adding the footboards one by one.

IMG_7951.jpeg


Ok...more later. Feel free to ask questions if you have any.
 

symphonicpoet

Moderator
Love it! A good scratchbuild is a thing to behold and it's a lot of fun to follow along as you plan it and build it. The dragon is going to have a truly lovely home. :)
 
Love it! A good scratchbuild is a thing to behold and it's a lot of fun to follow along as you plan it and build it. The dragon is going to have a truly lovely home. :)
Ahhh but sir...the diorama is done...read the first post in this thread...these are but the beginnings.
 
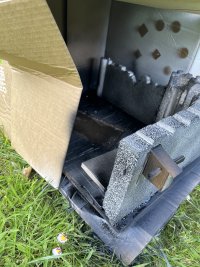
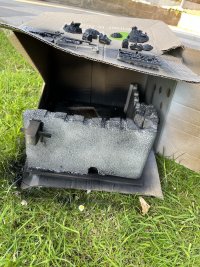
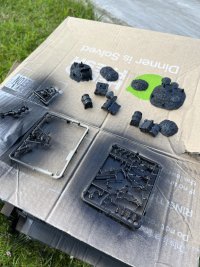
Ok, so the main build bits are largely done. I thought a bit of primer might be the next step. Actually, I was wrong. I should have built the wall bricks first and added the paster to the inside but hey...this was a learning journey, and I was totally winging it. I always prime outside in the garden as I'm sensitive to thinners.

IMG_8174.jpg

IMG_8173.jpgIMG_8172.jpg
The priming was a massive fail, the primer didn't seem to like Polystyrene or the other way around. So I ended up painting the whole thing black with some cheap craft acrylic. The polystyrene texture was still very strong though, later I'd come up with a few solutions for that and if I'd had more time, I would have eliminated it completely.
 

Loose Loser

Member
You should used acrylic spray instead of primer ( if you're heavy at it, amount of primer will melt it ). Something like Liquitex or similar like Amsterdam Acrylic spray can but those things got strong odour so I usually cover it with Gesso ( like you did at the end, but instead of acrylic paint, primer is better as it's binder where acrylic isn't ).
 

The Exterior Walls​


The walls were a worry for me and remain the worst aspect of the model in my opinion. They look OK, but the pattern of the polystyrene shows through in way too many places, despite me treating it liberally with Mod Podge and paint, plaster etc. At first, I had no clue how I was going to do the brickwork. I’d seen posts on social media showing people building vast buildings with little blue blocks. ] which looked awfully tedious. After researching around I thought “Look, it’s the only way, so get on with it”. And to be fair, it was very easy and quite therapeutic.

I didn’t have the blue foam that most diorama makers seem to have …Instead, I opted for Foam chips the ones that look like “cheesy wotsits / Cheetos” I cut them into shape and glued them in place using Modpodge. I used MP because it seemed to dry a lot faster than normal PVA.

Mortar
I had no idea how I was going to do the mortar…but came up with the idea that if I use Polyfiller mixed with sand, and then water it down, I could tilt the castle and pour the mortar all over the walls to create that “patched and patched again” look


img_8298.jpg
img_8299.jpg
img_8300.jpg
img_8328.jpg
img_8332.jpg
img_8331.jpg

I then painted the exterior walls black with a mix of hobby acrylic and Mod Podge to help hold it and prevent it from cracking. It created a bit of a glossy texture but I felt that added to its charm…as an old decaying castle wall might well look wet in places, especially if it’s covered in moss and such like.

img_8453.jpg
img_8467-1.jpg

Next, it was time to add the flock to create that mossy look. Ideally, I would have remembered to add colour to the various blocks and then do the dry brushing first…but to hell with convention.

img_8494.jpg
img_8502.jpg
img_8501.jpg
img_8495.jpg

Next came the interior walls which I did with plaster scraped across the wall and then scratched off in certain places. It looked rubbish but improved when I added some green and brown wash to look as though water had run down allowing the birth of mould and algae.

Then it was a bit of dry brushing on all the wood, just to make it look weathered. Again I added some green and brown washes just to make things look as though nature was overrunning the place.
 
Ok, chaps, the time has come to share the whole article with you. It's simply too long to replicate the whole thing here. Thanks for being patient.
 
Great stuff. Interesting to read about how this came together and heartening to learn about the bits support from the community. Love all the detailing. BA’s treasure pile raised a smile.

How are you going to top it this year?
 
Great stuff. Interesting to read about how this came together and heartening to learn about the bits support from the community. Love all the detailing. BA’s treasure pile raised a smile.

How are you going to top it this year?
Hey there, the reality is most likely that I'm not going to be able to top it this year. It was a minor miracle that I won last year and really probably only down to the scale and grandiose aspect of the project. I thought the other dioramas were painted better. I plan to focus my efforts on one of the other categories, in which I've never had much luck..keep trying though, eh?
 
Back
Top