Space Hulk Terminators (2nd edition)

Dreamfish

Administrator
Thanks tancrede and you're absolutely right, a proper 2nd ed. banner is already on its way.

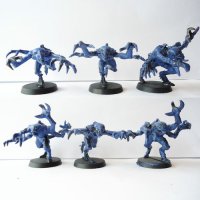
I like the new and old stealers. The new are obviously superiour than the old ones, but I don't like the feet pose. They all seem to be gliding through the air with that left feet off the ground. I found this comparison picture, see below. Maybe I should mix old and new together.


I remember a conversation with Bryan Ansell about model postures. He specifically mentioned fingers. Just twitching them a bit could create a more dynamic pose. It strikes me that all the new genestealer fingers are straight and the old ones actually have that pose that Bryan was talking about.
 

Attachments

  • $(KGrHqV,!qkF!9Nzm9zVBQ,KB8Noq!~~60_12.JPG
    $(KGrHqV,!qkF!9Nzm9zVBQ,KB8Noq!~~60_12.JPG
    39.7 KB · Views: 1,636

Dreamfish

Administrator
Last night I officially started working on the ultramarine squat. I applied a base color and the first highlight. It's hard to see on the pictures, but the blue is coming out real smooth and nice. I've got a good feeling about this project ;)

DNGPrBUJ


GW5y0EOz


BC1S1co8


7wqBEREW
 

Asslessman

Member
Looking very good indeed.
I'm quite interested in your technique and would have a few question if you don't mind :
- are all your highlights spread from a zenithal direction or do you spray with an angle from prefered directions (front and back for example) and then leave the zenithal spray for the last highlight only?
- do you line between areas with ink/washes after that?
- do you line edges to add some contrast?

Anyway, these look brilliant just like the Blood angel did and This is a result I would like to work for.
 

tancrede

Member
Nice shade of blue.
I your Ultrasmurfs are as good as the Blood Angels, you will have another beautiful unit.
 

Dreamfish

Administrator
Citadel Collector":3csq7keb said:
Dreamfish":3csq7keb said:
ultramarine squat

Now that I'd like to see! Just kidding ;)
It's spelled with a "d" isn't it? :oops:

@Asslessman, I try not to spray directly onto the miniature, but instead start spraying from the outside and move over the miniature. This prevents accidental splatters from getting onto the miniature and gives me slightly better control of the amount of paint. For the highlights I used the "above" direction, so light is coming from above at an angle of about 45 degrees from all directions. I keep the angle, but turn the miniature around while spraying paint with quick "flyby" sprays. Sometimes I adjust the angle, some parts just don't get enough paint otherwise or I only spray over those parts that need a little extra. I also set the spraygun to a certain maximum limit. This helps me not to spray too much paint at once.

I did not apply inks, washes or edges to add contrast. I'm planning to do an oil wash and/or other touch ups after applyingall the highlights.
 

Dreamfish

Administrator
Asslessman":1eitq15y said:
Thank you for these very valuable and precise answers. It actually helps a lot.
I am glad to be helping you, but remember, I'm no expert in this, just doing what feels best.

Just finished the blue. Added two more highlights, applied an dark blue oil wash and sealed it with Testors Dull coat. I have to say, they really came out good. Blue is a lot easier to work with. Now I need to figure out how to get those heads white again.

OUEsljqe


CIcaVqqG
 

Dreamfish

Administrator
Wrapped the marines in tape and sprayed the heads white. I could have painted them, but that wouldn't be proper airbrush fun. Don't they look cute?

fF7ujdyA


WKQ3Dbo5
 

Mutantdale

Member
Looking great so far Dreamfish..
The banner is on its way too so it should be there soon.
Is it going ton the Ultramarine squad you are doing now?

MD
 

Dreamfish

Administrator
Thanks Mutantdale and yes I'm planning to put the banner on this squad. I shall be waiting for it to arrive.
 

Dreamfish

Administrator
Made steady progress. Taped the arms, sprayed the arms white and afterwards red, did a gradient on the power sword, gave the white and red faces a grey and red wash and base painted the necessary parts black. Last airbrush taks on the list is the checker stripes on the Power Fists.

pRqUaF27


YszTxOqa


pb6LEbFh


7WZWlsHu
 

Harry

Moderator
I had an air brush. Couldn't get on with it. Too much of a faff. Also it felt a bit like cheating.

However ... These do look great. :grin:
 

mbh

Member
Dreamfish":2zswean6 said:
Aiteal":2zswean6 said:
Lovely stuff, but damn you man! Now I want an airbrush :)
Haha, if you want I can remove the pictures, but I believe it's already too late :twisted:


me 3


any chance you can give us a run down of what you use?
 

Dreamfish

Administrator
mbh":2qwae3ut said:
Dreamfish":2qwae3ut said:
Aiteal":2qwae3ut said:
Lovely stuff, but damn you man! Now I want an airbrush :)
Haha, if you want I can remove the pictures, but I believe it's already too late :twisted:


me 3


any chance you can give us a run down of what you use?
I'm planning to make a detailed description of the steps involved once I'm done. For now I'm just uploading quick WIP shots.
 

Dreamfish

Administrator
The last airbrush task, the checkered stripes on the power fists. This one was a bit of an experiment. I wasn't quite sure if it would work. I printed the checkered stripes on paper, placed it over a pice of tape, cut out the stripes and placed them on the power firsts. It was a bit of puzzle to get them lined out correctly. Luckily, my first attempt was spot on. The stripes are 30 pixels in width and printed with a resolution of 72 DPI. Again, I sprayed first with white and afterwards with yellow, before removing the tape. The pictures below show the raw results after removing the tape. Taping took about 1 hour, the paint 10 minutes. You can see the results need some fine tuning, but I'm happy with the overall results.

SqS2hMcI


Pv56Df9C
 

Asslessman

Member
That's was daring of you to try airbrushing+masking on such a tiny shape as the gloves but it proved worthy !

Seriously I wouldn't have thought possible to achieve that result. There is some tuning to do but even know the result is neat. One candid question though, why did you remove the tape before working on your yellows (shade/highlight)?
I guess it was to see if it was good enough and you can always correct things on the blck stripe later.
Anyway, ther's some serious skill to be learnt from your work.

Next step : masking the whole minis and airbrushing every single skull :grin:
 
Back
Top