


ManicMan
Lord
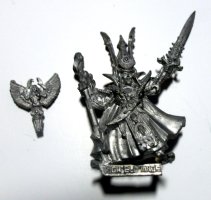
Okay, for what should be my Golden Gobbo 2026, I picked up Jes Goodwins 1992 High Elf Mage Teclis in a joblot. The staff was a bit damaged but I could tell that, and it's thick enough to pin, While I do have some high elves, They aren't an army I'm collecting up but I do kinda like this guy so I wanted to paint him up. Well, this'll give a reason.
I am awful at working out a colour scheme and stuff. So first thought, Lets see what the masters did. I kinda ended up with two and I'm gonna go for the most obverse one. The one I didn't pick is a bit weird. The Geoff Taylor cover shot from the 1992 4ed High Elves Army book features, for some reason, Teclis riding a Dragon. Okay, that would be fun but no.. I'm not doing a heavy mod here. On this cover, Teclis is pretty much decked out in gold. It's a pretty nice image but I decided NOT to go with that scheme. I'm going with one of my favourite painters. Is he the best? probably not, but come-on, I haven't made anyone with even one speck of taste who doesn't love Mike McVey!
While it might not be the most imagination in the world, I decided to really have a decent look through the High Elf Army book (my father has/had a small High Elf army. Not many that got painted up but still some and the army book) and.. Oh, not only is there some pictures of Mike's paint work on him, but a short article. Nice. He talks about some of the paints he used and why. It's a short buy fun 2 page spread and a nice way to try to improve my painting skills.
I'm not 100% sure I want to copy some of how he did this figure.. he aid in a change from normal, he decided to paint areas individual before moving to the next. Some of the old paint guides used this style too.. I'm sorry, but I can't base, shade, highlight one area, then move to the next and NOT have the odd bit of oversplash. I prefer to base all, shade all, and THEN doing the touchups and highlighting.
There is NO WAY I'm gonna get this fantastic to his grade. I also might decide to change some bits as I do (I tried some of the cape trimming.... hang on, he painted up that cloak the same way he did the AHQ wizard... interesting, and it's just too small and fine for me..) but I'm gonna try and see how things go. And I was kinda surprised the one he painted appear to be the final model and not a prototype. This is a model with alot of detail but not overly cluttered. I think the best approach to a sculpt is when you can have a fair level of detail but it's not soo overly cluttered that it's just a chore. With the right balance, its kinda up to the painter how much of the detail they bring out. With some sculpts, if you don't bring out alot of detail, it just looks like you are really bad.
First step, Cleaning up the figure and repairing that Staff damage.
I am awful at working out a colour scheme and stuff. So first thought, Lets see what the masters did. I kinda ended up with two and I'm gonna go for the most obverse one. The one I didn't pick is a bit weird. The Geoff Taylor cover shot from the 1992 4ed High Elves Army book features, for some reason, Teclis riding a Dragon. Okay, that would be fun but no.. I'm not doing a heavy mod here. On this cover, Teclis is pretty much decked out in gold. It's a pretty nice image but I decided NOT to go with that scheme. I'm going with one of my favourite painters. Is he the best? probably not, but come-on, I haven't made anyone with even one speck of taste who doesn't love Mike McVey!
While it might not be the most imagination in the world, I decided to really have a decent look through the High Elf Army book (my father has/had a small High Elf army. Not many that got painted up but still some and the army book) and.. Oh, not only is there some pictures of Mike's paint work on him, but a short article. Nice. He talks about some of the paints he used and why. It's a short buy fun 2 page spread and a nice way to try to improve my painting skills.
I'm not 100% sure I want to copy some of how he did this figure.. he aid in a change from normal, he decided to paint areas individual before moving to the next. Some of the old paint guides used this style too.. I'm sorry, but I can't base, shade, highlight one area, then move to the next and NOT have the odd bit of oversplash. I prefer to base all, shade all, and THEN doing the touchups and highlighting.
There is NO WAY I'm gonna get this fantastic to his grade. I also might decide to change some bits as I do (I tried some of the cape trimming.... hang on, he painted up that cloak the same way he did the AHQ wizard... interesting, and it's just too small and fine for me..) but I'm gonna try and see how things go. And I was kinda surprised the one he painted appear to be the final model and not a prototype. This is a model with alot of detail but not overly cluttered. I think the best approach to a sculpt is when you can have a fair level of detail but it's not soo overly cluttered that it's just a chore. With the right balance, its kinda up to the painter how much of the detail they bring out. With some sculpts, if you don't bring out alot of detail, it just looks like you are really bad.
First step, Cleaning up the figure and repairing that Staff damage.


