[strange grogge] 1: spike the gun

twisted moon

Moderator
i fancied a bit of black powder fantasy skirmishing, and strange grogge is always a good fit. if i want to add heavier weapons then i tend to combine them with panzerfaust, wessex games fantasy wwi/ii ruleset.


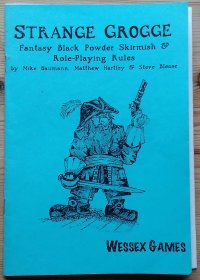
i got these direct from wessex games several many years ago and always find they give a fun game. however, they are very definitely not designed for competitive play especially since the force creation is largely random. a .pdf is available from wargame vault for anyone interested: https://bit.ly/3yqP2YX.

background -
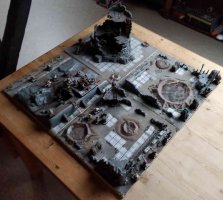
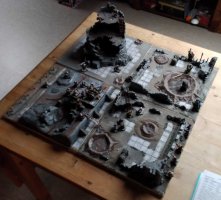
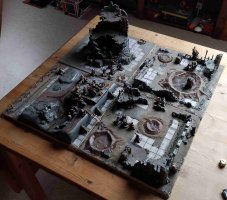
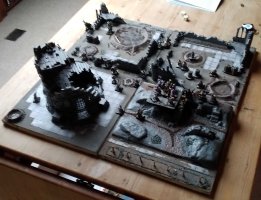
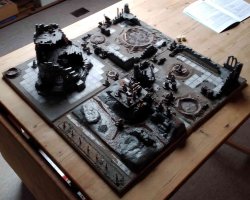
the kaiserzwerge assault on vermyngrad has ground to a halt and been reduced to a war of attrition between small groups fighting in the ruins.
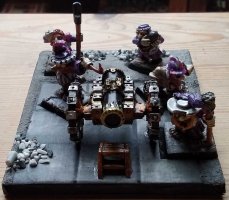
an siege gun, operated by the traitor anschlußzwerge, has been wreaking havoc on the kkaiserzwerge supply lines, and now a small commando group has been sent to take it out of action.

(outside the roleplaying rules) the sole characteristic is salt, which ranges in value from 2 to 11 depending on species, unit type and experience, it can also vary up and down through the course of the game. this is tested against by rolling 2d6.
unit sizes are random, and dependant on species modified by unit type. you then role for each member of the unit to determine their starting experience. once this is done you designate one as the leader and give them +1 salt.
equipment has to be bought, the number of doubloons available is randomly determined by unit type.

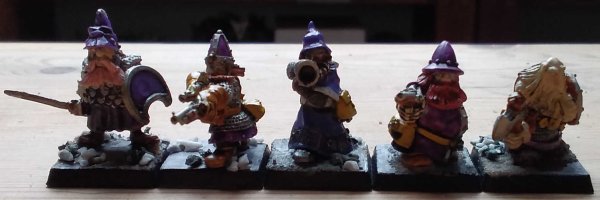
the anschlußzwerge defenders:

the siege gun plays no active role in the game and it, and its militia crew are provided free.


normal leader salt 8 with belt pistol
normal salt 7
normal salt 7
green salt 5
green 5
... all unarmed.

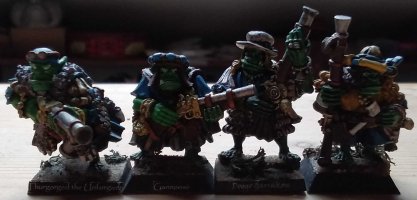
unit 1: 10 dwarf Infantry with 66 doubloons


from left to right -
experienced sallt 9 with musket and buff coat
experienced salt 9 with musket and buff coat
normal salt 8 with halberd and buff coat
green leader salt 7 with twin duelling pistols and cuirass
green salt 6 with spear
green salt 6 with spear.
 

Attachments

  • Strange Grogge rules.jpg
    Strange Grogge rules.jpg
    223.6 KB · Views: 973
  • The Objective.jpg
    The Objective.jpg
    191.1 KB · Views: 973
  • Anschlusszwerge defenders.jpg
    Anschlusszwerge defenders.jpg
    137.6 KB · Views: 973
unit 2: 12 rat marines with 72 doubloons


veteran salt 9 with horse pistol, 1 grenade and cutlass
normal leader salt 8 with horse pistol, cutlass, knife and cuirass
normal salt 7 with musket and 2 grenades
green salt 5 with cutlass and buckler
green salt 5 with cutlass and buckler, green salt 5 with cutlass and buckler
green salt 5 with cutlass and buckler

the kaiserzwerge attackers:

unit 1: 5 dwarf elite infantry with 98 doubloons


experienced salt 11 with 2 grenades, long sword, buckler and cuirass
green leader salt 9 with twin duelling pistols, cutlass, main gauche, dagger and cuirass
green salt 8 with blunderbuss, 2 grenades, dagger and cuirass
green salt 8 with belt pistol, 2 grenades and cutlass
green salt 8 with 2 grenades, boarding axe, buckler and cuirass.

unit 2: 4 orc privateers with 66 doubloons


green leader salt 8 with musket, twin belt pistols and buff coat
green salt 7 with shotgun, belt pistol, long sword and buff coat
green salt 7 with musket, cutlass and buff coat
 

Attachments

  • Ratssian allies.jpg
    Ratssian allies.jpg
    148.4 KB · Views: 970
  • Kaiserzwerge raiders.jpg
    Kaiserzwerge raiders.jpg
    85 KB · Views: 970
  • Goblinoid mercenaries.jpg
    Goblinoid mercenaries.jpg
    110.6 KB · Views: 970
the kaiserzwerge plan is simple: the goblinoid mercenaries will provide a distraction to occupy the defenders and then the dwarf commandos will launch their assault.
the game starts at the point that the defenders have spotted the goblinoid attackers.


the ratssians are deployed in and around the tower at the top of the image.
the siege gun and anshlusszwerge guard are on the tile to the left.
the goblinoids are behind the wall on the righthand tile.
the kaiserzwerge are hidden behind the wall at the bottom.

turn 1 -
the kaiserzwerge side win the initiative and the goblinoids are activated.
the shotgun wielding goblinoid seeks to run to the cover of the wall in front, he is at a -4 Salt penalty due to the Clutter of the area through which he is passing meaning he needs to roll 3 or less on 2d6 - a big ask. he fails, rolling a 4, so can only move half his maximum; this would be 8cm but he also has a -1 penalty for his Buff coat, so he moves forward 7cm into the crater.
the goblinoid leader takes a shot at one of the anschlußzwerge with spear; he’s at -1 for long range and -1 for firing through clutter 4 terrain. he fails with a roll of 10 and misses.
the first musket wielding goblinoid also tries to run forward to the cover of the wall, with the same penalty, also fails and moves forward 7cm.
the final goblinoid seeks to run around the side of the building, fails and moves 7cm.

the ratssians activate, and the veteran seeks to run to defend the wall that the goblinoids are seeking to reach. this only requires crossing clutter 2 terrain, so he needs to roll 7 or less to succeed; he rolls a 7 and reaches his destination.
the musket armed ratssian outside the building seeks to walk to where he can see what’s happening but rolls a double 5 – a critical failure! he doesn’t move and losses 1 salt as he panics.
one of the green ratssians inside the building seeks to run after the veteran rolls a double 4 and also stays in place losing 2 points of Salt.
the comrade next to him, however, rolls a double 1 - a critical success. he gains 2D6cm (2) movement and 1 salt, making it to the wall.
the last ratssian on the ground floor fails and moves half distance – 12cm.
the first of the green ratssians outside the building passes his salt check and runs 24cm towards the wall.
the other two fail and move 12cm.
the two green ratssians on the first floor seek to walk down the stairs. Both fail and move 8cm.
the ratssian leader follows them. he has a target of 6 due to modifiers and rolls a double 4; however, criticals are always against unmodified salt, so this is a critical success. he adds 1D6cm (2) to his movement and gains 1 salt. i also decide he can push his way past his subordinates and take the lead.
the second ratssian with musket tries to climb the ladder to the second floor and succeeds.

the kaiserzwerge activate, but decide not to do anything this turn in the hopes that they will remain unseen and the anschlußzwerge in front of them will be drawn off by the goblinoids leaving them with a free run at the cannon in subsequent turns.

the anschlußzwerge activate. the green trooper who was shot at seeks to run towards the goblinoids across clutter 4 terrain, fails and moves 10cm.
his green comrade seeks to follow suite with the same result.
the other four green dwarves all seek to walk to where they can see what’s going on. all fail and move 7cm.
the leader seeks to climb to gain a vantage point, but fails and stays put.
the musketeer near the cannon fails his salt roll, but 7cm is enough for him to achieve his objective of walking to the top of the ladder.
the second musketeer heads towards the leader for orders, but fails for another 7cm move.


turn 2 -
the anschlußzwerge side win the initiative roll.
the ratssian on the second floor of the tower takes a shot at the shotgun wielding goblinoid at -1 for long range. he rolls a double 6 for a critical failure, losing 1 salt and having to roll on the weapon malfunction table: a 1 indicates bad powder, he must reload.
the veteran also takes a shot at the shotgun wielder with his horse pistol. he is at -2 for long range and clutter, but he hits with a 7 and takes 2 salt from his target.
emboldened by this success (and probably his own critical success last turn), the green ratssian next to him decides to jump over the wall to see if he can engage the enemy. he passes and crosses the wall; a jump action can be combined with a walk or run action so he decides to try and charge the closest musket armed goblinoid. he succeeds, easily bringing him into base-to-base contact. having engaged means he can now also make a melee attack; this is one busy ratssian. both figures make salt checks; the ratssians luck runs out as he rolls a double 6 for a critical failure. the goblinoid rolls 3 for a success, referencing the close combat table, this means the ratssian suffers -2 Salt.
the other green ratssian near the wall seeks to run around the side of the wall towards the goblinoid leader. he fails for half movement.
the next closest ratssian seeks to run to support his comrade in melee but critically fails and stays in place with -2 salt.
the green ratssian in the building seeks to run forward to the wall. he fails for half movement.
the ratssian leader seek to run to reinforce the veteran. the same fate befalls him.
the two green ratssians at the foot of the stairs try the same with one success and one failure (for half movement).
the two ratssians at the side of the tower try the same with one failure (for half movement) and one critical failure for -2 salt.
the second musketeer decides to try and run around the back of the tower to get a line of sight. he succeeds.
finally the veteran reloads his pistol with a critical success for +1 salt.

the goblinoids activate.
with a ratssian popping up in front of the him, the goblinoid on the right takes a shot with his musket at -2 for range and clutter. he fails his salt roll and misses.
the goblinoid in melee continues the fight. he rolls a success and his opponent a fail, meaning the ratssian loses another 2 salt leaving him with 2. If the ratssian loses another point of salt he will rout.
the goblinoid with the shotgun fires at the ratssian veteran but rolls a critical failure. the lock jams requiring repair, and he loses another point of salt.
the goblinoid leader seeks to reload his musket but fails.

the anschlußzwerge activate.
their leader makes another attempt at climbing onto the bulwark but fails again.
the musketeer at the top of the ladder is content where he is.
the other musketeer walks up the base of the bulwark by the leader.
the halbardier decides to move into better cover behind the gabions and scores a critical success for +1 Salt.
the spear-dwarf closest to the goblinoid leader seeks to run to engage him. he roles a success and gets into base-to-base combat to immediately fight a round of melee. both roll a success meaning the dwarf pushes the goblinoid back 1D6+2cm (7) and off the table! the rules seem silent, so i determine the goblinoid isn’t coming back but that the dwarf follows him off the table. this means the goblinoids have effectively lost their leader and have to roll on the death of leader table. the shotgun armed one fails and is dispirited for -1 salt putting him down to 3. the others pass for no effect.
the next spear-dwarf tries to run towards the goblinoids but fails for a movement of 10cm.
the others continue their walk to see what all the commotion is about. one succeeds and the other three fail.

the kaiserzwerge activate; they judge the going is about as clear as it going to get and launch their assault.
the experienced dwarf runs towards the nearest spear-dwarf looking to engage. He rolls a critical success, doesn’t need the extra movement and can’t increase his salt above 11. he then initiates a melee attack. it's a success for the attacker versus a failure for the defender meaning the anschlußzwerge suffers -2 salt.
the blunderbuss armed dwarf seeks to jump the wall but fails, remaining where he is.
the kaiserzwerge leader also seeks to jump the wall and succeeds, he then looks to run for the cover of the gabions and succeeds again, easily reaching them despite the 2cm penalty from his cuirass.
the axe armed dwarf seeks to jump the wall but fails and stays in place.
finally the belt pistol armed kaiserzwerge also tries to jump the wall and succeeds. he then tries to run to back up his leader but fails for half movement.
 

Attachments

  • Deployment.jpg
    Deployment.jpg
    234.1 KB · Views: 966
  • Turn 1.jpg
    Turn 1.jpg
    246.4 KB · Views: 966
  • Turn 2.jpg
    Turn 2.jpg
    244 KB · Views: 966
turn 3 -
the anschlußzwerge side win the initiative and the anschlußzwerge themselves active first to try and negate the threat to the cannon from the kaiserzwerge.
the leader tries to climb onto the bulwark and finally succeeds.
the musketeer by the ladder takes a shot at the kaiserzwerge with belt pistol but misses.
the other musketeer seeks to climb onto the bulwark and succeeds.
the dwarf with halberd seeks to engage the kaiserzwerge leader and passes his movement roll to do so. both succeed in the melee roles so the kaiserzwerge is forced back D6+2cm (6) and the anschlußzwerge follows him to maintain engagement.
the spear-dwarf has a go at the kaiserzwerge veteran. again both succeed and the kaiserzwerge is pushed back 5cm.
the unengaged spear-dwarf closest to the action seeks to run forward to support his comrade but fails his test and only moves 10cm to roughly parallel with the most advanced ratssian.
the next most advanced can also no see the action and so looks to run around the edge of the bulwark to protect the cannon. he also fails and runs 10cm.
the remaining two continue walking towards the disturbance. the first suffers a critical fail for a loss if 1 salt, but the second succeeds.

the kaiserzwerge activate.
the experienced dwarf attacks his opponent; he succeeds but the anschlußzwerge fails, suffering -2 salt and putting him down to 2.
the leader draws his cutlass and main gauche and launches a return attack, just scraping a hit due to the weapon modifier. the halbardier fails and so suffers -2 Salt.
the blunderbuss armed dwarf has another go at jumping the wall and succeeds. he then tries to run for the shelter of the gabions but fails, moving 10cm into the crater.
the pistol armed dwarf tries to run for the ladder but fails for 10cm of movement.
the boarding axe armed dwarf seeks to jump over the wall and critically succeeds, getting to move an extra 1D6cm (3) and gaining 1 salt. he then also tries to run towards the ladder but fails for 10cm of movement.

the Ratssians activate.
the veteran fires at the goblinoid with shotgun and hits to cause another 2 salt of damage. this takes his target down to 1 salt causing him to rout.
the ratssian in combat attacks his goblinoid opponent. both roll failures for no effect.
the musketeer outside the tower takes a shot at the only enemy he can see, the goblinoid on the far right. he hits to take 2 salt from his target.
the second musketeer seeks to clear the bad powder and reload his musket, which he manages to do.
the green ratssian furthest forward seeks to run to engage the experienced kaiserzwerge. he fails for 12cm of movement which isn’t enough to get him into base-to-base contact.
the remaining green ratssians all seek to run forward. one suffers a critical failure causing him to rout. there are five failures (for a move of 12cm) and one success, who moves along the wall defended by the veteran.
the leader also succeeds and goes to stand alongside the veteran.

the goblinoids activate.
the musketeer in combat presses the fight. he succeeds while the ratssian fails, so the ratssian loses 2 salt and routs.
the second musketeer seeks to reload but critically fails losing 1 salt and causing a malfunction: the flint breaks but can be repaired with a +1 modifier, the musket remains unloaded.


turn 4 -
the kaiserzwerge side seizes the initiative and the kaiserzwerge themselves go first to try and push through.
the experienced dwarf continues the melee; he succeeds whilst his opponent fails so the anschlußzwerge loses 2 salt causing him to rout.
the leader also continues the melee. Both pass so the anschlußzwerge is pushed back 3cm and the kaiserzwerge follows up.
the blunderbuss armed dwarf turns to fire at the spear-dwarf to his right, but misses.
the kaiserzwerge with belt pistol throws a grenade at the anschlußzwerge with musket at the top of the ladder. he succeeds despite the penalty for long range and takes 1 salt from both his target and the other musket armed anschlußzwerge. the anschlußzwerge leader is just out of the blast radius.
the remaining raiserzwerge tries to run to the base of, and up, the ladder to engage the anschlußzwerge leader, and succeeds making it to the top of the bastion despite the movement penalty from his cuirass. The anschlußzwerge is forced to engage in unarmed Brawling, but rolls a critical success with double 1 gaining 1 salt; the kaiserzwerge rolls an ordinary success and is disarmed! He will also be indulging in unarmed brawling until he has the opportunity to reclaim his axe.

the anschlußzwerge activate.
the furthest advanced spear-dwarf seeks to run to engage the experienced kaiserzwerge but fails for a half move.
the spear-dwarf at the corner of the bastion seeks to run to engage the kaiserzwerge with belt pistol but critically fails for -2 salt and stays frozen in place.
the remaining two spear-dwarves both fail salt rolls for walk movement and move 7cm, one in the general direction of the goblinoids, the other back in the direction of the grenade blast.
the anschlußzwerge leader engages his opponent in fisticuffs. However, he fails while the kaiserzwerge succeeds and so ends up suffering -1 salt.
one of the musket-dwarves is already in base-to-base contact following the boarding axe armed Kaiserzwerge's charge up the ladder, so he also launches an unarmed attack. both succeed so the kaiserzwerge is forced 6cm back down the ladder.
the other musketeer fires at the same kaiserzwerge at short range and hits for -2 salt.

the goblinoids activate.
the one with the broken musket seeks to repair it but fails.
the other goblinoid takes a shot at the ratssian veteran. due to the modifiers he can only succeed on a critical, which he doesn’t get.

the ratssians activate.
the musketeer outside the tower seeks to reload and succeeds.
the second musketeer takes a shot at the goblinoid on the far right but misses.
the closest green ratssian seeks to run to engage the goblinoid on the far right. he fails for a half move which doesn’t quite get him into base-to-base contact.
the leader fires at the goblinoid in the open. he scores a critical with a double 3, gaining 1 salt and killing the goblinoid outright.
the veteran seeks to reload his horse pistol and succeeds.
two of the green ratssians run towards the sole remaining goblinoid, failing their salt tests for half moves.
Tthe furthest advanced green ratssian walks to engage the experienced kaiserzwerge, fails but easily has enough movement to get into base-to-base contact. both succeed their salt rolls for melee and the combat is forced back 10cm.
the remaining green ratssians seek to run towards the sound of the fighting by the cannon. both fail for half moves.


with their goblinoid allies all but destroyed and reinforcements pouring in to defend the cannon i call the game here and decide the kaiserzwerge will seek to bug out before they become too bogged down. The anschlußzwerge cannon continues to fire in the brave defence of vermyngrad.

sorry about the low quality of the photographs, this was partly because of the poor light the day i played, but the blurring is entirely my responsibility. i hope they're good enough for you to make sense of the action.
 

Attachments

  • Turn 3.jpg
    Turn 3.jpg
    248.7 KB · Views: 964
  • Turn 4.jpg
    Turn 4.jpg
    198.6 KB · Views: 963
I'll read in a minute, but do I spy Citadel plastic vac formed craters on those boards! How I wish I still had mine...
 
quite possibly, i certainly have some, i bought off ebay, which i've used on my ruined boards along with ones from amera plastic mouldings, resin ones from various sources, and home made ones from cardboard rings and crumpled foil.
 
Back
Top